Tuesday, July 17, 2012

aaarrrggghhhh!!!! The ATELIER!!!

My "work in progress" continues to be a work in progress...  will the atelier EVER be finished???

It is slow going with me filling up 2 of these AWESOME Thirty-One totes to haul stuff two flights of stairs (you'd think I'd lose weight or tone up some muscles, but I ain't seeing any of  either yet!)

Here is the new space, just the bones of it.  I'm concentrating on getting moved in, then I'll work on getting it spiffed up.

I'm realizing I've got alot of aspirations for this room...  this is my paint cabinet (bought @ a flea market & made fom metal peg board - so GREAT for hanging lots & lots of stuff on!!!)

GardenRidge bookcases bought many years ago, one now flipped on top of the other - perfect sized cubbies for my scrapbook albums & pages (eventually, this will be my scrapping bookcase - right now, it's kinda a catch-all as I slowly move in)

Industrial shelving makes up my work table & my back credenza - underneath storage, storage, storage!  Yay, right???  That's my hope, anyway...

At some point, I'm expecting an organized wrapping station.  Needless to say, there is no need for me to EVER buy another roll of wrapping paper again.  Ever.

Aaaah, clever me!  A cardboard shoe organizer from my college years (yes, it's been around THAT long & is still "together!") - I use this to organize my wrapping tissue.  Um, just like my wrapping paper, I have no need to ever buy anymore.  Well, not for a very long time anyway.

The white table & bench seating I inherited from my grandmother - I love this so!  Every now & then I'll need to SIT, so this is definitely going to come in handy.  Love that I will have this in THIS room!  So much of my creativity comes from my grandmother & I think of her often when I'm dabbling.  Miss, miss, miss her!!!

Snatched up the 12x12 paper racks from an online yardsale for $20.  As I've attempted to load paper, I've realized this proably isn't the best spot, but for now, it will have to do.  Again, once I'm fully moved in, I'll figure out where to final put things....

My craft cubbies for project organization & other things (tbd).  The copper mailbox was an impulse buy from Marshall's.  Still don't know what I'm going to do with it!

More wrapping supplies - bows & ribbons in the blue box & drawers, tags & things to the right.  Really wanting an consistent look at some point.  We'll figure that out later!

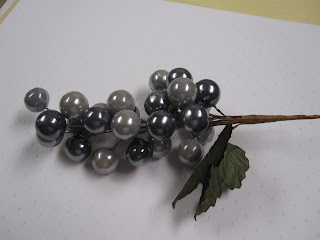
A-ha!  Picked up this "sprig" years ago because I thought the colors were pretty.  Have tucked it here & there through the years & just realized: THESE are my room colors!  It's become my color inspiration.  The grays match my walls & steel shelving PERFECTLY!  Sooooo inspired now!


***** UPDATE *****
ANOTHER inspiration!!!  The craft cubbies (by JetMax) on my back credenza will be the perfect organization for me!  So fortunate they were on sale 40% off @ Michael's last week.  I picked up a few more AND I got another 40% coupon to use this week if I decide I need more.  Wish me luck in getting them put together at some point this week & being one step closer to getting this room together:  I am on a roll!!!

Here's an inspirational photo from the JetMax website:  Doesn't this look LOVELY????


Wednesday, July 11, 2012

a Pinterest party

Another time sucker in my life:  Pinterest.

But, boy, what fun!  I've got 25 boards, which is absolutely ridiculous.  This is so reflective of my life...

A friend had a "wonderful" (insert sarcastic sigh) idea to have a Pinterest party. We were partnered into teams of 2 & challenged to pick a craft project from Pinterest, buy enough supplies for everyone & meet up for a "Pinterest Party."  Oh, and our theme was "Halloween."

Yep, Halloween in July.  Whoda thunk it?

This was our inspiration - found @the "She Wears Flowers" blog (but I did see it on Pinterest. Honest, I did!)


When it came time to find the materials, we quickly decided our version would be a little different.  Here is what we pulled together to use:  16x20 canvas (not shown), Mod Podge, newspaper cut and ripped into 4x4 squares, one 4x4 canvas for each project, Halloween ribbon, black vinyl, Halloween color paint (black, green, purple & orange), Cricut Halloween cartridges (October 31, Happy Hauntings and Blackletter)


First, we painted the canvas the background color of our choosing (I picked purple)


Mod Podging was a bit more tedius then we expected.  It wasn't easy to get the thin newspaper to stay in place - we figured out we had to Mod Podge it into place, then Mod Podge over it.  Sticky & gooey...


The Cricut cut-outs took forever, but we had a blast working on it!


Here we are, showing off our finished boards.  Well, almost finished - we need to add our bows.  Our bow expert had to rush home to a family dinner, but she promised to get them to us.  Soon.


Is it Halloween yet?


Coming Up:  the other 2 projects we worked on (sneak peek of one in the picture above).


Sunday, May 13, 2012

back in the atelier...

My life has been on hold for several years...  I am slowly revisiting my "me time" activities.  We've carved out a niche for just me out of a space in the basement and I spent the better part of yesterday shuffling the contents of my hobbies to their new home.  They're not quite in place yet, but just seeing them again - in boxes covered with dust, albeit - I'm drawn like a moth to flame.  Maybe, just maybe, I'll be back full force & soon.  It has been far too long!

I did accomplish one thing - I was inspired to make a card for my mom for Mother's Day.


The picture sucks and it's portrait instead of landscape - um, really???????????????  Maybe this is why I don't blog more?  Can't figure anything out.  I swear...

So!  This is where I'm supposed to provide the ingredients for the recipe, right?  All I can identify is the Stampin' Up! Owl punch - tooooo adorable!  The papers are generic construction paper I found in my son's school supplies and the card itself was a ready made blank inside note card I picked up years ago.  The stickers are from Wal-mart.  I drew the tree branch, the hearts and the question mark, but you probably figured that out on your own.  Inside I wrote "We do!" and signed our names.

Quick, simple and fun.  And what a sense of accomplishment! 

I really should do this more often. 

Now off to Google how to flip my picture (it's right in my photo library.  Why isn't it right here???  ~sigh~)